Microsoft Releases CRM 2013 Mobile App for Windows Phone 8, iPhone and Android user’s.
Field Level Security user privileges for a particular attribute using javascript in CRM 2011 & CRM 2013
Posted: October 27, 2013 in CRM 2011, CRM 2013, JscriptsgetUserPrivilege
Returns an object with three Boolean properties corresponding to privileges indicating if the user can create, read or update data values for an attribute.
Xrm.Page.getAttribute("attributeschema").getUserPrivilege().canCreate
Xrm.Page.getAttribute("attributeschema").getUserPrivilege().canUpdate
Xrm.Page.getAttribute("attributeschema").getUserPrivilege().canRead
MS CRM 2011 supports integration with Windows Azure, by integrating it we can register plug-in’s and can pass the execution context to the azure solution.
MS Dynamics CRM 2011 has been integrated with the Windows Azure platform by coupling the Microsoft Dynamics CRM event execution pipeline to the Windows Azure Service Bus so effectively during save/update operation we can send processed information to Azure Service Bus. For detailed information look here
MS CRM 2011 can send messages to service bus using 4 different contracts:
1) Queue
2) One-way
3) Two-way
4) REST
In my blog, i’m going to work with the Two-Way Listener. Two way contract requires an active listener and if there is no active listener on an endpoint, the Microsoft Dynamics CRM post to the service bus fails. A Two way contract can return a string value from the listener to MS CRM 2011.
Here, I’m going to write the Two way listener code in the Azure Worker Role. Worker roles are applications that are developed to run asynchronously and to work on long-running or perpetual tasks independent of user interaction or input. It is similar to a windows service and uses a simple while(true) loop and a sleep statement.
To work with the Windows Azure Worker role, first you need to install the Windows Azure Sdk. Here is the link to download the Sdk.
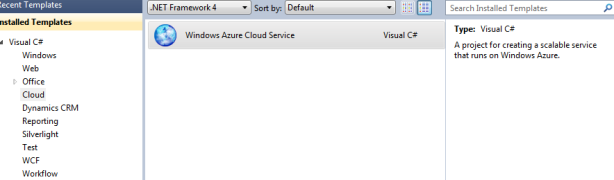
Once the installation is done, you should get "Windows Azure Cloud Service" in your visual studio.

To create and deploy Worker Role, you should have the Windows Azure account. You can create a free azure trail account here.
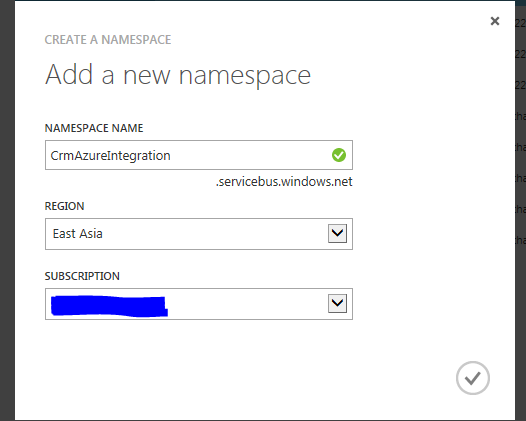
First login into your Windows Azure account and create a Service Bus NameSpace. In my sample, my Servie Bus NameSpace is "CrmAzureIntegration"

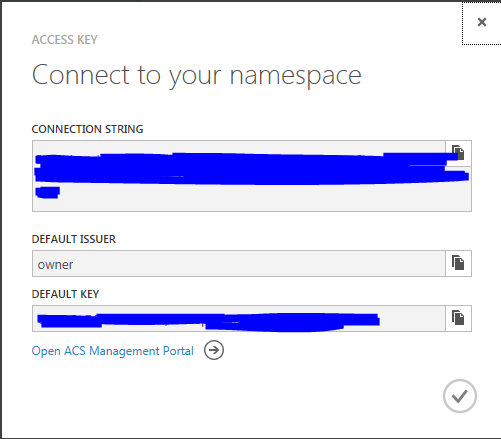
Once the Service Bus Namespace is created, you should able to see "Default Issuer and Default Key"
Creating a Worker Role
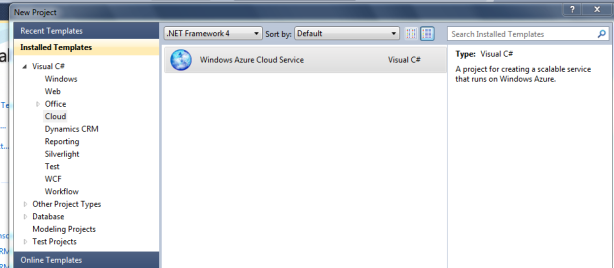
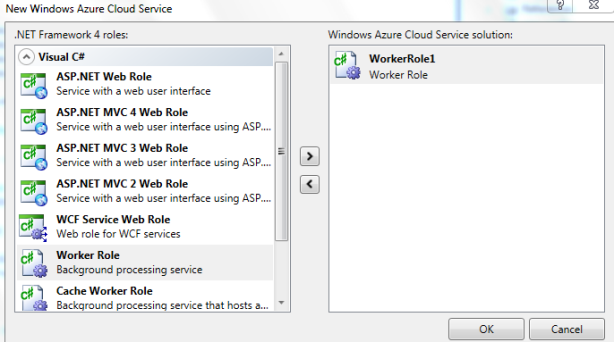
Open Visual Studio 2010, Click on New Project and select "Windows Azure Cloud Service" Click on Ok.
Select Worker Role and give it a Name.
Add the following References to your Worker Role Project:
1) Microsoft.xrm.sdk
2) Microsoft.ServiceBus
3) System.ServiceModel
4) System.Runtime.Serialization
Inherit the "ITwoWayServiceEndpointPlugin" to your Worker Role as shown below.
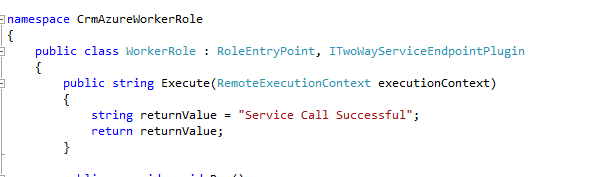
Add the following code to your worker role. You can also get the code from crm sdk
using System;
using System.Collections.Generic;
using System.Diagnostics;
using System.Linq;
using System.Net;
using System.Runtime.Serialization;
using System.ServiceModel;
using System.Threading;
using Microsoft.ServiceBus;
using Microsoft.WindowsAzure;
using Microsoft.WindowsAzure.Diagnostics;
using Microsoft.WindowsAzure.ServiceRuntime;
using Microsoft.WindowsAzure.Storage;
using Microsoft.Xrm.Sdk;

namespace CrmAzureWorkerRole
{
    public class WorkerRole : RoleEntryPoint, ITwoWayServiceEndpointPlugin
    {
        public string Execute(RemoteExecutionContext executionContext)
        {
            string returnValue = "Service Call Successful";
            return returnValue;
        }

        public override void Run()
        {
            // This is a sample worker implementation. Replace with your logic.
            Trace.TraceInformation("CrmAzureWorkerRole entry point called", "Information");

            while (true)
            {
                Thread.Sleep(10000);
                Trace.TraceInformation("Working", "Information");
            }
        }

        public override bool OnStart()
        {
            // Set the maximum number of concurrent connections
            ServicePointManager.DefaultConnectionLimit = 12;

            // For information on handling configuration changes
            // see the MSDN topic at http://go.microsoft.com/fwlink/?LinkId=166357.

            // Activate the Listener
            ActivateListener();

            return base.OnStart();
        }

        public void ActivateListener()
        {
            ServiceBusEnvironment.SystemConnectivity.Mode = ConnectivityMode.Http;

            // Add service bus namespace
            string serviceNamespace = "crmazureintegration";

            // Add Default issuer name
            string issuerName = "owner";

            // Add Service bus Default Key
            string issuerKey = "<Add key here>";

            string servicePath = "WorkerRole";

            // Leverage the Azure API to create the correct URI.
            Uri address = ServiceBusEnvironment.CreateServiceUri(
                Uri.UriSchemeHttps,
                serviceNamespace,
                servicePath);

            // Create the shared secret credentials object for the endpoint matching the
            // Azure access control services issuer
            var sharedSecretServiceBusCredential = new TransportClientEndpointBehavior()
            {
                TokenProvider = TokenProvider.CreateSharedSecretTokenProvider(issuerName, issuerKey)
            };

            // Using an HTTP binding instead of a SOAP binding for this endpoint.
            WS2007HttpRelayBinding binding = new WS2007HttpRelayBinding();
            binding.Security.Mode = EndToEndSecurityMode.Transport;

            // Create the service host for Azure to post messages to.
            ServiceHost host = new ServiceHost(typeof(WorkerRole));
            host.AddServiceEndpoint(typeof(ITwoWayServiceEndpointPlugin), binding, address);

            // Create the ServiceRegistrySettings behavior for the endpoint.
            var serviceRegistrySettings = new ServiceRegistrySettings(DiscoveryType.Public);

            // Add the service bus credentials to all endpoints specified in configuration.

            foreach (var endpoint in host.Description.Endpoints)
            {
                endpoint.Behaviors.Add(serviceRegistrySettings);
                endpoint.Behaviors.Add(sharedSecretServiceBusCredential);
            }

            // Begin listening for messages posted to Azure.
            host.Open();
        }
    }
}
Now we need to create a plug-in to call the Execute method which will initiate posting the execution context to the service bus.
Add the following References to your Plug-in:
1) Microsoft.xrm.sdk
2) System.Runtime.Serialization
You can get the following plug-in code from the crm sdk.
using System;
using System.Collections.Generic;
using System.Linq;
using System.Text;
using Microsoft.Xrm.Sdk;

namespace CrmAzurePlugin
{
    public class CrmAzureIntegration : IPlugin
    {
        private Guid serviceEndpointId;
        Entity entity = null;

        public CrmAzureIntegration(string config)
		{
			if (String.IsNullOrEmpty(config) || !Guid.TryParse(config, out serviceEndpointId))
			{
				throw new InvalidPluginExecutionException("Service endpoint ID should be passed as config.");
			}
		}

        public void Execute(IServiceProvider serviceProvider)
        {
            // Retrieve the execution context.
            IPluginExecutionContext context = (IPluginExecutionContext)serviceProvider.GetService(typeof(IPluginExecutionContext));

            if (context.InputParameters.Contains("Target") && context.InputParameters["Target"] is Entity)
            {
                // Obtain the target business entity from the input parameters.
                entity = (Entity)context.InputParameters["Target"];
            }

            // Extract the Organization Service
            IOrganizationServiceFactory serviceFactory = (IOrganizationServiceFactory)serviceProvider.GetService(typeof(IOrganizationServiceFactory));

            IOrganizationService service = serviceFactory.CreateOrganizationService(context.UserId);

            // Extract the tracing service.
            ITracingService tracingService = (ITracingService)serviceProvider.GetService(typeof(ITracingService));
            if (tracingService == null)
                throw new InvalidPluginExecutionException("Failed to retrieve the tracing service.");

            IServiceEndpointNotificationService cloudService = (IServiceEndpointNotificationService)serviceProvider.GetService(typeof(IServiceEndpointNotificationService));
            if (cloudService == null)
                throw new InvalidPluginExecutionException("Failed to retrieve the service bus service.");

            try
            {
                tracingService.Trace("Posting the execution context.");
                string response = cloudService.Execute(new EntityReference("serviceendpoint", serviceEndpointId), context);

                if (!String.IsNullOrEmpty(response))
                {
                    // Update response back to the record
                    UpdateResponse(response, (Guid)entity.Attributes["crm_integrationid"], service);
                }
                tracingService.Trace("Done.");
            }
            catch (Exception e)
            {
                tracingService.Trace("Exception: {0}", e.ToString());
                throw;
            }
        }

        public void UpdateResponse(string response, Guid recordId, IOrganizationService service)
        {
            Entity integrationEntity = new Entity("crm_integration");
            integrationEntity["crm_response"] = response;
            integrationEntity.Id = recordId;
            service.Update(integrationEntity);
        }

    }
}
In the above code, once i get the response i’m going to update the crm record with the response string.
Now open your Plug-in Registration tool and Register the Service Endpoint as shown below :
Click on Register New Service EndPoint.
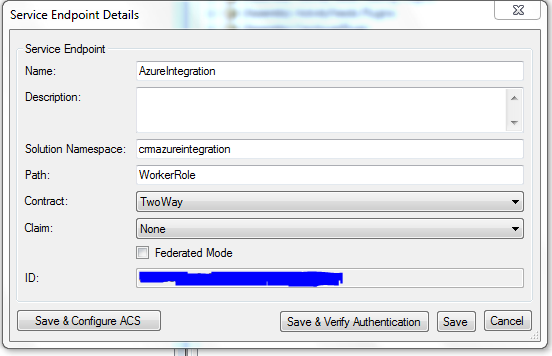
Add Name, Service Bus Namespace, Path, Select Contract as Two Way and click "Save and Configure ACS"

Add Service Bus Default key in Management Key

Download the certificate and Issuer Name from CRM. Login into crm, navigate to Settings and click on customizations, select Developer Resources
Once everything is added, Click on Configure ACS and finally click on Save and Verify Authentication.
Now you need to register the plugin and pass the service endpoint id from the unsecure configurtaion. In my case i’ve added the plugin on create of entity record.

You can get the service endpoint id once you Register the Service Endpoint as shown below:

Now we can go ahead and test the application. First we need to Activate the listener, so Run the worker role and set the breakpoint at "Execute" method.
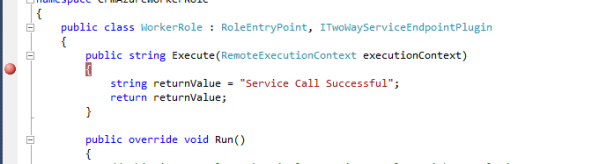
Once the listener is active, go to crm and create the entity record to trigger the Execute method.

Once u save the record, Execute method in Worker role gets triggered and sends back the "Service Call Successful" string to crm and updates the record in "Response" attribute as shown below.


Deploy Worker Role to Azure Cloud Service
Right Click on your Azure Project and select Package and Click "Package" button as shown below

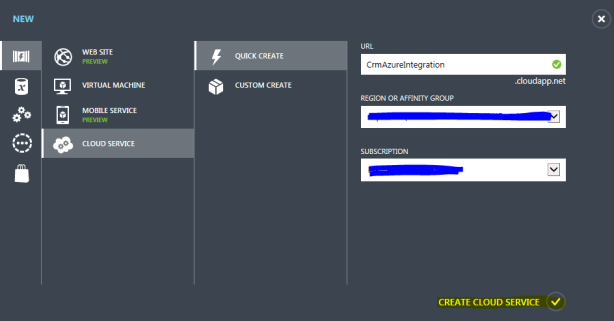
Now open your Windows Azure account, click on "Cloud Services" and select New. Add the URL name and click on "Create Cloud Service"
Once your cloud service is created, Click on "Configure" and select "Upload A New Production Deployment"
Add the Deployment Name and select the Package and Configuration files which you have published earlier and click Ok.

It takes few minutes to create your service and start running.
Once everything is finished and if your cloud service is running perfectly, that means now your listener is activated and you can go head and create your entity record in crm to trigger your service.
Happy coding 🙂
Create record in MS CRM 2011 Online using C# Code
Add "Microsoft.Xrm.Sdk" reference from your sdk bin folder.
Then add the following namespaces
1) using Microsoft.Xrm.Sdk;
2) using Microsoft.Xrm.Sdk.Client;
3) using System.ServiceModel.Description;
4) using System.Web.Services.Protocols;
Finally add the below code :
try
            {
                ClientCredentials cre = new ClientCredentials();
                cre.UserName.UserName = "<username>.onmicrosoft.com";
                cre.UserName.Password = "<password>";

                Uri serviceUri = new Uri("https://<orgname>.api.crm5.dynamics.com/XRMServices/2011/Organization.svc");

                OrganizationServiceProxy proxy = new OrganizationServiceProxy(serviceUri, null, cre, null);
                proxy.EnableProxyTypes();
                IOrganizationService service = (IOrganizationService)proxy;

                Entity ent = new Entity("<entitySchemaName>");
                ent.Attributes["new_name"] = "Created from Console App4";
                service.Create(ent);
            }
            catch (SoapException ex)
            {

            }
            catch (Exception ex)
            {

            }
Happy Coding 🙂
Retrieving More than 50 records using OData in CRM 2011
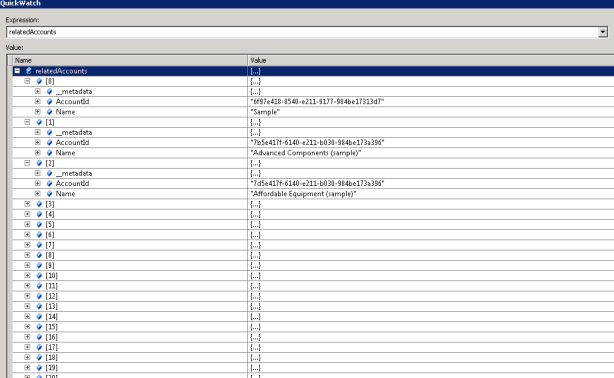
Posted: December 7, 2012 in CRM 2011, JscriptsWhen retrieving records using OData in MS CRM 2011 the page size is fixed to Max 50 records. So in my example I’m going to push the first 50 records in an array and retrieve next page results using the URI (“__next”) provided in the JSON response object.
In my case i’m going to retrieve records in Account entity. Here is the code:
relatedAccounts = [];

function onload() {
    var serverUrl = Xrm.Page.context.getServerUrl();
    var oDataUri = serverUrl + "/xrmservices/2011/OrganizationData.svc/AccountSet?$select=AccountId,Name,&$filter=StateCode/Value eq 0";
    GetRecords(oDataUri);
    var totalRecords = relatedAccounts.length;
}

function GetRecords(url) {
    jQuery.ajax({
        type: "GET",
        contentType: "application/json; charset=utf-8",
        datatype: "json",
        url: url,
        async: false,
        beforeSend: function (XMLHttpRequest) {
            XMLHttpRequest.setRequestHeader("Accept", "application/json");
        },
        success: function (data, textStatus, XmlHttpRequest) {
            if (data && data.d != null && data.d.results != null) {
                AddRecordsToArray(data.d.results);
                FetchRecordsCallBack(data.d);
            }
        },
        error: function (XmlHttpRequest, textStatus, errorThrown) {
            alert("Error :  has occured during retrieval of the records ");
        }
    });
}

function AddRecordsToArray(records) {
    for (var i = 0; i < records.length; i++) {
        relatedAccounts.push(records[i]);
    }
}

function FetchRecordsCallBack(records) {
    if (records.__next != null) {
        var url = records.__next;
        GetRecords(url);
    }
}


Retrieve data using FetchXml with multiple link entities in CRM 2011
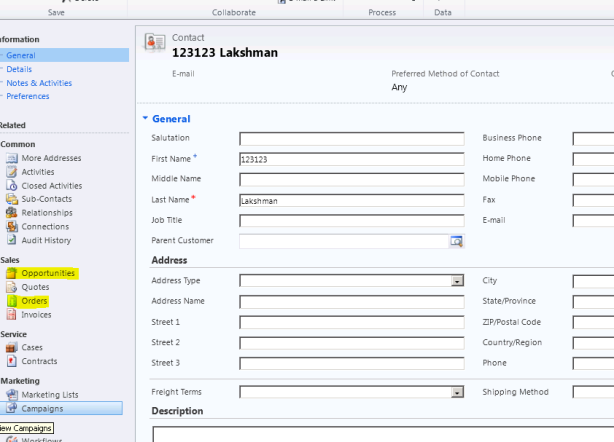
Posted: November 30, 2012 in Code Snippets, CRM 2011In my example below i’m going to retrieve link entities opportunity and orders in Contact entity.
Below is the fetch xml code:
string fetchXml = @"<fetch version='1.0' output-format='xml-platform' mapping='logical' distinct='true'>
                                    <entity name='contact'>
                                        <attribute name='fullname' />
                                        <attribute name='contactid' />
                                        <link-entity name='opportunity' from='customerid' to='contactid' link-type='outer'>
                                            <attribute name='name' />
                                            <attribute name='description' />
                                        </link-entity>
                                        <link-entity name='salesorder' from='customerid' to='contactid' link-type='outer'>
                                            <attribute name='name' />
                                            <attribute name='ordernumber' />
                                        </link-entity>
                                    </entity>
                                </fetch>";

            var result = service.RetrieveMultiple(new FetchExpression(fetchXml));
Hope is helps 🙂
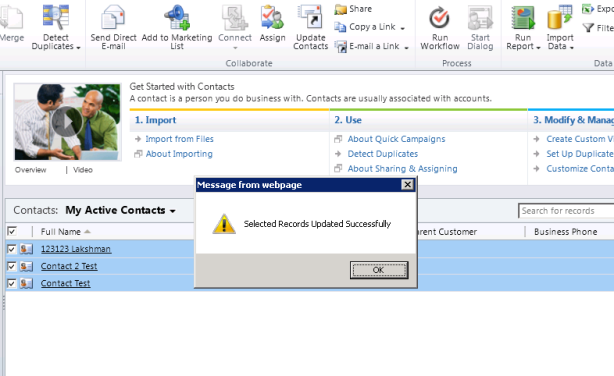
Update Selected Records in Home Page entity grid in CRM 2011
Posted: November 29, 2012 in CRM 2011, RibbonsIn one of my requirement i need to update the selected records in the home page contact entity grid by clicking on the custom ribbon button. Below is the code to add a ribbon button in the home page contact entity and update the selected records.
To update the records using OData, you need to add jquery1.4.1.min and json2 files. You can get those files from sdk
path – \sdk\samplecode\js\restendpoint\jqueryrestdataoperations\jqueryrestdataoperations\scripts.
Create a new solution, add the contact entity and export the solution. Open the customizations.xml file and replace the <RibbonDiffXml> with following code.
<RibbonDiffXml>
        <CustomActions>
          <CustomAction Id="Isv.contact.MainTab.CustomAction" Location="Mscrm.HomepageGrid.contact.MainTab.Collaborate.Controls._children" Sequence="41">
            <CommandUIDefinition>
              <Button Id="Isv.Grid.Contact.MainTab" Command="Isv.Grid.Contact.UpdateRecord.Command" LabelText="$LocLabels:Isv.Grid.Contact.UpdateRecord.LabelText" ToolTipTitle="$LocLabels:Isv.Grid.Contact.UpdateRecord.ToolTip" ToolTipDescription="$LocLabels:Isv.Grid.Contact.UpdateRecord.ToolTip" TemplateAlias="o1" Image16by16="/_imgs/ribbon/SendShortcut_16.png" Image32by32="/_imgs/ribbon/SendShortcut_32.png" />
            </CommandUIDefinition>
          </CustomAction>
        </CustomActions>
        <Templates>
          <RibbonTemplates Id="Mscrm.Templates"></RibbonTemplates>
        </Templates>
        <CommandDefinitions>
          <CommandDefinition Id="Isv.Grid.Contact.UpdateRecord.Command">
            <EnableRules>
              <EnableRule Id="Isv.Grid.Contact.OneSelected.EnableRule" />
            </EnableRules>
            <DisplayRules>
              <DisplayRule Id="Isv.Grid.Contact.UpdateRecord.DisplayRule" />
            </DisplayRules>
            <Actions>
              <JavaScriptFunction Library="$webresource:crm_json2.js" FunctionName="IsNAN">
              </JavaScriptFunction>
              <JavaScriptFunction Library="$webresource:crm_jquery1.4.1.min.js" FunctionName="IsNAN">
                </JavaScriptFunction>
              <JavaScriptFunction Library="$webresource:crm_contact.js" FunctionName="updateRecord">
                <CrmParameter Value="SelectedControlSelectedItemIds" />
              </JavaScriptFunction>
            </Actions>
          </CommandDefinition>
        </CommandDefinitions>
        <RuleDefinitions>
          <TabDisplayRules />
          <DisplayRules>
            <DisplayRule Id="Isv.Grid.Contact.UpdateRecord.DisplayRule">
              <CrmClientTypeRule Type="Web" />
            </DisplayRule>
          </DisplayRules>
          <EnableRules>
            <EnableRule Id="Isv.Grid.Contact.OneSelected.EnableRule">
              <SelectionCountRule AppliesTo="SelectedEntity" Minimum="1" />
            </EnableRule>
          </EnableRules>
        </RuleDefinitions>
        <LocLabels>
          <LocLabel Id="Isv.Grid.Contact.UpdateRecord.LabelText">
            <Titles>
              <Title languagecode="1033" description="Update Contacts" />
            </Titles>
          </LocLabel>
          <LocLabel Id="Isv.Grid.Contact.UpdateRecord.ToolTip">
            <Titles>
              <Title languagecode="1033" description="Update the selected Contact records" />
            </Titles>
          </LocLabel>
        </LocLabels>
      </RibbonDiffXml>
After replacing the code save the file and import the solution into the CRM.
Make sure the jscript file and function name exists in your webresource. Below is my jscript function
function updateRecord(selectedIds) {
    if (selectedIds != null && selectedIds != "") {
        var strIds = selectedIds.toString();
        var arrIds = strIds.split(",");
        for (var indxIds = 0; indxIds < arrIds.length; indxIds++) {
            updateContactRecords(arrIds[indxIds]);
        }
        alert("Selected Records Updated Successfully");
    }
    else {
        alert("No records selected!");
    }
}

function updateContactRecords(contactId) {
    var objContact = new Object();
    objContact.CreditOnHold = true;

    var jsonEntity = window.JSON.stringify(objContact);

    var serverUrl = Xrm.Page.context.getServerUrl();
    var ODATA_ENDPOINT = "/XRMServices/2011/OrganizationData.svc/ContactSet";
    var ODataPath = serverUrl + ODATA_ENDPOINT;
    $.ajax({
        type: "POST",
        contentType: "application/json; charset=utf-8",
        datatype: "json",
        url: ODataPath + "(guid'" + contactId + "')",
        data: jsonEntity,
        beforeSend: function (XMLHttpRequest) {
            XMLHttpRequest.setRequestHeader("Accept", "application/json");
            XMLHttpRequest.setRequestHeader("X-HTTP-Method", "MERGE");
        },
        error: function (xmlHttpRequest, textStatus, errorThrown) {
            alert("Status: " + textStatus + "; ErrorThrown: " + errorThrown);
        }
    });
}

Click here to view all the <CrmParameter> values that can be passed.
SetStateRequest setStateRequest = new SetStateRequest();

// In my case i'm Cancelling Task Activity
setStateRequest.EntityMoniker = new EntityReference(Task.EntityLogicalName, taskId);

// Set the State and Status OptionSet Values to Cancelled.
setStateRequest.State = new OptionSetValue(2);
setStateRequest.Status = new OptionSetValue(6);

// Execute the Response
SetStateResponse setStateResponse = (SetStateResponse)service.Execute(setStateRequest);
In the same way you can “Cancel” or “Complete” any CRM 2011 Activity by passing the EntityReference accordingly.
Below are the State and Status Code OptionSet values for CRM 2011 Activities.
Task
Fax
Phone Call
Email
Letter
Appointment
Service Activity
Campaign Response
Recurring Appointment
Adding a Custom Tab and Group to SubGrid in CRM 2011
Here i need to add a custom button by creating a new custom tab to the subgrid.

In my case I’m going to add sub grid button for opportunity entity. Create a new solution, add the opportunity entity and export the solution.
Open the customizations.xml file and replace the <RibbonDiffXml> with following code
<RibbonDiffXml>
        <CustomActions>
          <CustomAction Id="Mscrm.SubGrid.opportunity.CustomTab.CustomAction" Location="Mscrm.SubGrid.opportunity.ContextualTabs._children" Sequence="40">
            <CommandUIDefinition>
              <Tab Id="Mscrm.SubGrid.opportunity.CustomTab" Command="Mscrm.SubGrid.opportunity.CustomTab" Title="$LocLabels:Mscrm.SubGrid.opportunity.CustomTab.Title" Description="$LocLabels:Mscrm.SubGrid.opportunity.CustomTab.Title" Sequence="500">
                <Scaling Id="Mscrm.SubGrid.opportunity.CustomTab.Scaling">
                  <MaxSize Id="Mscrm.SubGrid.opportunity.CustomTab.CustomGroup.MaxSize" GroupId="Mscrm.SubGrid.opportunity.CustomTab.CustomGroup" Sequence="10" Size="LargeMedium" />
                </Scaling>
                <Groups Id="Mscrm.SubGrid.opportunity.CustomTab.Groups">
                  <Group Id="Mscrm.SubGrid.opportunity.CustomTab.CustomGroup" Command="Mscrm.SubGrid.opportunity.CustomGroup" Sequence="10" Title="$LocLabels:Mscrm.SubGrid.opportunity.CustomGroup.Title" Template="Mscrm.Templates.3.3">
                    <Controls Id="Mscrm.SubGrid.opportunity.CustomTab.CustomGroup.Controls">
                      <Button Id="Mscrm.SubGrid.opportunity.CustomTab.CustomGroup.CustomButton" ToolTipTitle="$LocLabels:Mscrm.SubGrid.opportunity.CustomButton.ToolTip" ToolTipDescription="$LocLabels:Mscrm.SubGrid.opportunity.CustomButton.ToolTip" Command="Mscrm.SubGrid.opportunity.CustomButton" Sequence="10" LabelText="$LocLabels:Mscrm.SubGrid.opportunity.CustomButton.LabelText" Image16by16="/_imgs/Ribbon/Enable_16.png" Image32by32="/_imgs/Ribbon/Enable_32.png" TemplateAlias="o1" />
                    </Controls>
                  </Group>
                </Groups>
              </Tab>
            </CommandUIDefinition>
          </CustomAction>
        </CustomActions>
        <Templates>
          <RibbonTemplates Id="Mscrm.Templates"></RibbonTemplates>
        </Templates>
        <CommandDefinitions>
          <CommandDefinition Id="Mscrm.SubGrid.opportunity.CustomButton">
            <EnableRules>
              <EnableRule Id="Mscrm.Enabled" />
            </EnableRules>
            <DisplayRules/>
            <Actions>
              <JavaScriptFunction Library="$webresource:crm_accountjscript" FunctionName="RibbonButtonClick" />
            </Actions>
          </CommandDefinition>
          <CommandDefinition Id="Mscrm.SubGrid.opportunity.CustomTab">
            <EnableRules>
              <EnableRule Id="Mscrm.Enabled" />
            </EnableRules>
            <DisplayRules>
              <DisplayRule Id="Mscrm.SubGrid.opportunity.CustomTab.DisplayRule" />
            </DisplayRules>
            <Actions />
          </CommandDefinition>
          <CommandDefinition Id="Mscrm.SubGrid.opportunity.CustomGroup">
            <EnableRules>
              <EnableRule Id="Mscrm.Enabled" />
            </EnableRules>
            <DisplayRules>
              <DisplayRule Id="Mscrm.SubGrid.opportunity.CustomGroup.DisplayRule" />
            </DisplayRules>
            <Actions />
          </CommandDefinition>
        </CommandDefinitions>
        <RuleDefinitions>
          <TabDisplayRules>
            <TabDisplayRule TabCommand="Mscrm.SubGrid.opportunity.CustomTab">
              <EntityRule EntityName="opportunity" Context="SubGridStandard" />
              <EntityRule EntityName="opportunity" Context="SubGridAssociated" />
            </TabDisplayRule>
          </TabDisplayRules>
          <DisplayRules>
            <DisplayRule Id="Mscrm.SubGrid.opportunity.CustomTab.DisplayRule">
              <CrmClientTypeRule Type="Web" />
            </DisplayRule>
            <DisplayRule Id="Mscrm.SubGrid.opportunity.CustomGroup.DisplayRule">
              <CrmClientTypeRule Type="Web" />
            </DisplayRule>
          </DisplayRules>
          <EnableRules>
            <EnableRule Id="Mscrm.Enabled">
              <CrmClientTypeRule Type="Web" />
            </EnableRule>
          </EnableRules>
        </RuleDefinitions>
        <LocLabels>
          <LocLabel Id="Mscrm.SubGrid.opportunity.CustomButton.LabelText">
            <Titles>
              <Title languagecode="1033" description="Custom Button" />
            </Titles>
          </LocLabel>
          <LocLabel Id="Mscrm.SubGrid.opportunity.CustomButton.ToolTip">
            <Titles>
              <Title languagecode="1033" description="Custom Button" />
            </Titles>
          </LocLabel>
          <LocLabel Id="Mscrm.SubGrid.opportunity.CustomGroup.Title">
            <Titles>
              <Title languagecode="1033" description="Custom Group" />
            </Titles>
          </LocLabel>
          <LocLabel Id="Mscrm.SubGrid.opportunity.CustomTab.Title">
            <Titles>
              <Title languagecode="1033" description="Custom Tab" />
            </Titles>
          </LocLabel>
        </LocLabels>
      </RibbonDiffXml>
After replacing the code save the file and import the solution into the CRM.
Make sure the jscript file and function name exists in your webresource. Below is my jscript function
function RibbonButtonClick() {
    alert("Ribbon click fired");
}

Adding a Ribbon Button in Custom Group to SubGrid in CRM 2011
<RibbonDiffXml>
        <CustomActions>
          <CustomAction Id="Mscrm.Isv.opportunity.subgrid.MaxSizeCustomAction" Location="Mscrm.SubGrid.opportunity.MainTab.Scaling._children" Sequence="110">
            <CommandUIDefinition>
              <MaxSize Id="Mscrm.Isv.opportunity.subgrid.MaxSize" GroupId="Mscrm.Isv.opportunity.subgrid.Group0" Sequence="21" Size="LargeLarge" />
            </CommandUIDefinition>
          </CustomAction>
          <CustomAction Id="Mscrm.Isv.opportunity.subgrid.ScaleSizeCustomAction" Location="Mscrm.SubGrid.opportunity.MainTab.Scaling._children" Sequence="130">
            <CommandUIDefinition>
              <Scale Id="Mscrm.Isv.opportunity.subgrid.Popup.1" GroupId="Mscrm.Isv.opportunity.subgrid.Group0" Sequence="85" Size="Popup" />
            </CommandUIDefinition>
          </CustomAction>
          <CustomAction Id="Mscrm.Isv.opportunity.subgrid.SubgridCustomAction" Location="Mscrm.SubGrid.opportunity.MainTab.Groups._children" Sequence="300">
            <CommandUIDefinition>
              <Group Id="Mscrm.Isv.opportunity.subgrid.Group0" Sequence="600" Command="Mscrm.Isv.opportunity.subgrid.Group0" Title="$LocLabels:Mscrm.Isv.opportunity.CustomGroup.LabelText" Template="Mscrm.Templates.Flexible2">
                <Controls Id="Mscrm.Isv.opportunity.subgrid.Controls">
                  <Button Id="Mscrm.Isv.opportunity.form.CustomButton.Button"
                              Command="Mscrm.Isv.opportunity.form.CustomButton.Command"
                              LabelText="$LocLabels:Mscrm.Isv.opportunity.CustomButton.LabelText"
                              ToolTipTitle="$LocLabels:Mscrm.Isv.opportunity.CustomButton.LabelText"
                              ToolTipDescription="$LocLabels:Mscrm.Isv.opportunity.CustomButton.ToolTip"
                              TemplateAlias="o1"
                              Image16by16="/_imgs/Ribbon/Enable_16.png"
                              Image32by32="/_imgs/Ribbon/Enable_32.png" />
                </Controls>
              </Group>
            </CommandUIDefinition>
          </CustomAction>
        </CustomActions>
        <Templates>
          <RibbonTemplates Id="Mscrm.Templates"></RibbonTemplates>
        </Templates>
        <CommandDefinitions>
          <CommandDefinition Id="Mscrm.Isv.opportunity.subgrid.Command">
            <EnableRules />
            <DisplayRules>
              <DisplayRule Id="Mscrm.Isv.opportunity.subgrid.Notify.DisplayRule" />
            </DisplayRules>
            <Actions />
          </CommandDefinition>
          <CommandDefinition Id="Mscrm.Isv.opportunity.subgrid.Group0">
            <EnableRules />
            <DisplayRules>
              <DisplayRule Id="Mscrm.Isv.opportunity.subgrid.Notify.DisplayRule" />
            </DisplayRules>
            <Actions />
          </CommandDefinition>
          <CommandDefinition Id="Mscrm.Isv.opportunity.form.CustomButton.Command">
            <EnableRules />
            <DisplayRules />
            <Actions>
              <JavaScriptFunction Library="$webresource:crm_accountjscript" FunctionName="RibbonButtonClick" />
            </Actions>
          </CommandDefinition>
        </CommandDefinitions>
        <RuleDefinitions>
          <TabDisplayRules />
          <DisplayRules>
            <DisplayRule Id="Mscrm.Isv.opportunity.subgrid.Notify.DisplayRule">
              <CrmClientTypeRule Type="Web" />
            </DisplayRule>
          </DisplayRules>
          <EnableRules />
        </RuleDefinitions>
        <LocLabels>
          <LocLabel Id="Mscrm.Isv.opportunity.CustomButton.ToolTip">
            <Titles>
              <Title languagecode="1033" description="Custom Button" />
            </Titles>
          </LocLabel>
          <LocLabel Id="Mscrm.Isv.opportunity.CustomButton.LabelText">
            <Titles>
              <Title languagecode="1033" description="Custom Button" />
            </Titles>
          </LocLabel>
          <LocLabel Id="Mscrm.Isv.opportunity.CustomGroup.LabelText">
            <Titles>
              <Title languagecode="1033" description="Custom Group" />
            </Titles>
          </LocLabel>
        </LocLabels>
      </RibbonDiffXml>

